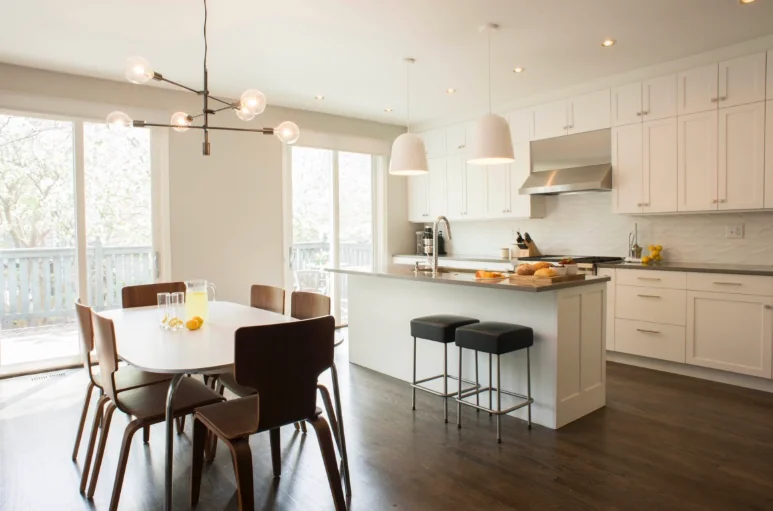
Tag: kitchen layout

  • Kitchen Island Design: Sizing, Seating and Clearances That Hold Up Every Day

    Kitchen Island Design: Sizing, Seating and Clearances That Hold Up Every Day

    Plenty of homeowners have taped an island onto their kitchen floor before calling a designer. They have walked around it, opened the dishwasher into it, and found out the hard way that the rectangle that looked generous in a photo leaves a 34 inch gap where two people need to pass. That moment is useful. Good kitchen island design is mostly a negotiation between the piece you want and the floor you have, and the floor wins every time.

    Work through an island in a fixed order: the space around it first, then its size and shape, then what it does, then who sits at it. Each decision narrows the next, and settling them in sequence keeps the finished island from looking wedged into the room.

    The aisles decide the island, not the other way around

    Start by drawing the paths, not the island. Every kitchen has a work aisle (between the island and the range, sink or refrigerator wall) and usually a walkway (the route people take to get through the room without cooking). These two paths have different jobs and need different widths.

    The NKBA Kitchen Planning Guidelines set the minimum work aisle at 42 inches when one person cooks, rising to 48 inches when several share the kitchen, which keeps two people from turning sideways to pass. A walkway should be at least 36 inches wide. Those numbers are measured from finished countertop edge to finished countertop edge, not from the cabinet boxes, and they need to hold when the appliances are open. A full-depth dishwasher door or a wall oven door dropped into a 42 inch aisle leaves very little room for anyone standing at the island behind it.

    Once those paths are drawn, whatever floor is left in the middle is your maximum island footprint. It is often smaller than people expect. In a lot of Chicago condos and older homes, the honest answer is a narrower island, a shorter one, or a peninsula that borrows a wall instead of floating free.

    Kitchen island size should follow the room’s proportions

    A kitchen island size that works on paper can still look wrong in three dimensions. Two proportions matter most.

    The first is length relative to the run it faces. An island that roughly mirrors the length of the main counter wall reads as part of the architecture. One that overshoots the wall at both ends starts to feel like furniture parked in the room, and one that is much shorter can look stranded. Letting the island stop a little short of the perimeter run on each end usually looks right, which also gives traffic a softer corner to round.

    The second is depth. Many work islands land somewhere around 36 to 42 inches deep. Add seating on the far side and you are closer to 48 inches or more. Go much past that and the center of the top becomes a place where things get pushed and forgotten, because nobody can reach it from either side. Deep islands also eat aisle width quickly, which sends you back to the first step.

    There is a practical ceiling too. Stone slabs only come so long, and a very long island often means a seam or a deliberate change of material. Plan that break as a design move, such as a change in height or a wood end section, so it never lands wherever the slab happens to run out.

    Decide what the island is for before you draw it

    The island’s job shapes its plumbing, electrical and the layout of the whole kitchen, so this decision belongs early in the space plan. There are three common versions, and each one asks for something different.

    A prep island

    This is the simplest and often the most useful. A long, uninterrupted surface facing the range gives you a place to chop, plate and spread out while staying turned toward guests. Storage below can be built around exactly what you prep with: knives, boards, mixing bowls, the sheet pans that never fit anywhere. A prep island with a small secondary sink is a strong choice for households that cook seriously and want the main sink to stay on the perimeter.

    A sink island

    Moving the main sink to the island puts the person washing up face to face with the room instead of a wall. It also means the dishwasher, trash and the mess on the counter around the sink are visible from the living area. If the kitchen opens to a family room, that trade deserves a hard look. When it works, the sink sits on the cooking side with clear counter on both sides, and the seating sits at the far end or on the opposite face, out of the splash zone.

    A cooktop island

    Cooking at the island is the most demanding version. It needs ventilation that works from the ceiling or from below, a clear path for the duct, and landing space on both sides of the cooking surface. Seating directly across from a cooktop is rarely a good idea; keep stools away from the burners or separate them with a deep buffer of counter. In condos, venting routes often settle this question before any design preference does, so confirm them with the building early.

    Whichever job you choose, make the island do one thing well. Islands that try to hold the sink, the cooktop and four stools usually end up doing all three badly.

    Torn between a sink island and a prep island, and unsure how either one would ripple through the rest of the kitchen? Bring a designer in now, while the answer is still a pencil line. Threshold Design Lab can look at your floor plan with you during a no-charge first consultation, in your kitchen or over video.

    Kitchen island seating needs its own clearances

    Kitchen island seating is where a plan that looks fine on paper most often fails in real life. Each seat needs width, knee space and room behind it.

    The same NKBA guidelines allow a knee space 24 inches wide for each seated diner. Four stools need around eight feet of seating edge, which is more than many islands can give once the ends are trimmed back for circulation.

    Knee space depth depends on height. At a 36 inch counter, the guidelines allow 15 inches. At a 42 inch bar height, 12 inches, because the stool raises the sitter. At a 30 inch table height, 18 inches. Too little overhang and people sit sideways with their knees against the cabinet doors.

    Behind the stools, think about what happens when someone is sitting there. If nobody needs to pass, the guidelines allow 32 inches from the counter edge to a wall or other obstruction. If traffic passes behind seated guests, they call for at least 36 inches to edge past and 44 inches to walk past. That measurement often tells you whether seating belongs on the long side of the island, the end, or not at all.

    Height is also a design decision, not just an ergonomic one. A single counter height keeps the island calm and gives you more usable surface. A raised bar ledge hides prep clutter from the living area but splits the top into two narrower zones that are harder to use for buffets or homework. Keep the top on one plane unless there is a clear sightline problem to solve.

    When two islands, or an island and a table, work better

    Some of the best kitchen island ideas involve less island, not more. If the floor plan has room for a very large island, ask whether two smaller pieces would serve the household better.

    Two islands make sense in larger kitchens, common in North Shore homes, where one island can be the working surface near the range and the second can be the gathering surface with seating, a beverage zone or a buffet top for entertaining. Each can be sized to a comfortable reach, and the aisle between them becomes a natural pass-through. The risk is crowding; two islands need all the clearances of one, plus a generous aisle in the middle.

    A table-height extension is another strong option, especially in open plans. The working part of the island stays at counter height, then steps down to a table at its end. You get chairs instead of stools, a place where people actually linger over dinner, and a softer transition between the kitchen and the living area. In a condo where a separate dining table would crowd the room, this can do the work of both.

    And sometimes the right island is a peninsula. Attaching one end to a wall frees up an entire aisle, keeps seating out of the cook’s path and still gives you a large surface. In tighter Chicago kitchens, the peninsula is often the layout that turns a cramped plan into a generous one.

    Lighting and finishes make the island read as part of the room

    Pendants over an island are placed by the island, not by the ceiling joists. Center them on the top, keep them clear of where tall people stand, and size them so they relate to the length of the island rather than filling it. Two larger fixtures often look calmer than four small ones. Pendants are only part of it; the island still needs even ambient light so the surface is not shadowed when someone leans over it.

    Finish choices are where the island can step forward or settle back. A contrasting color or a different stone can make the island the anchor of the room, which works when the perimeter is restrained. When the kitchen opens onto a living space, it helps to detail the seating side more like furniture, with panels, a furniture base or a change of material, so the side guests see does not look like the back of a cabinet run. The same sequencing of surfaces, lighting and utilities described in these elements of kitchen design applies to the island, just concentrated into one object.

    Carrying the island from drawing to build

    The island is usually the most coordinated object in the kitchen. It may carry plumbing, a dishwasher, outlets, a cooktop circuit, a duct and a stone top, all landing in the middle of the floor where none of those services already exist. Resolve it on the space plan and elevations before anything is ordered. When the people who drew the island also manage the trades and the install, a question about outlet placement or a seam location gets answered against the drawing, not improvised on site, and small problems can turn into better details: outlets tucked inside a drawer so the island ends stay clean, or a shallow cabinet built into the seating side for placemats and cookbooks.

    At Threshold Design Lab, our residential interior design work takes an island from the first clearance sketch to the day the countertop is templated and set, and the Barry condo kitchen and bath remodel is one finished example. For the cabinetry runs, lighting and storage around the island, see what a kitchen interior designer looks after in the rest of the room.

    The right island fits the way you live

    An island should make the kitchen easier to cook in and easier to be in. Draw the aisles first, size the island to what is left, give it one clear job, and plan seating with real clearances behind it. If the numbers do not work, a smaller island, a peninsula or a table extension will almost always serve you better than squeezing in the island from the photo.

    Have a kitchen plan in progress with an island you are not sure about? Send it over before the stone is ordered. Book time with our designers, free for the first consultation, or speak with us directly on (773) 433-0042.

    Frequently Asked Questions

    How big does a kitchen need to be for an island?

    There is no single minimum, because the answer depends on what surrounds the island. A practical test is whether you can keep about 42 inches of clear aisle on the working side and at least 36 inches on the others after placing even a small island around 2 feet by 4 feet. If you cannot, a peninsula or a movable work table is usually the better choice.

    Should an island be the same height as the rest of the counters?

    In most kitchens, yes. A single height gives you the largest usable surface and the calmest look. A raised ledge is worth considering only when you need to screen a sink or prep area from an adjoining living space, and a lowered table-height section works well when you want chairs and longer meals at the island.

    Can you put a dishwasher in a kitchen island?

    You can, and it is common with a sink island. Plan for the open door to land fully in the aisle without blocking the main walkway, keep the dishwasher next to the sink, and leave standing room beside it so someone can load it while another person passes. The plumbing and drain route through the floor should be confirmed before the island position is final.

    What shape of island works best in an open plan?

    Rectangular islands are the most efficient for storage and seating. In open plans, a long rectangle running parallel to the living area tends to work best because it creates a clear edge between the two zones. Curved or angled islands can help traffic flow around a corner, but they make seating and storage less efficient and are harder to light evenly.

    How many pendants should go over a kitchen island?

    The fixture count depends on the island’s length and the size of the fixture, not a fixed rule. Islands under about 7 feet often look best with two pendants, longer islands with two larger fixtures or three medium ones, and very long islands with a single linear fixture. Keep the end pendants set in from the ends of the top so the light falls on the work surface rather than the floor.
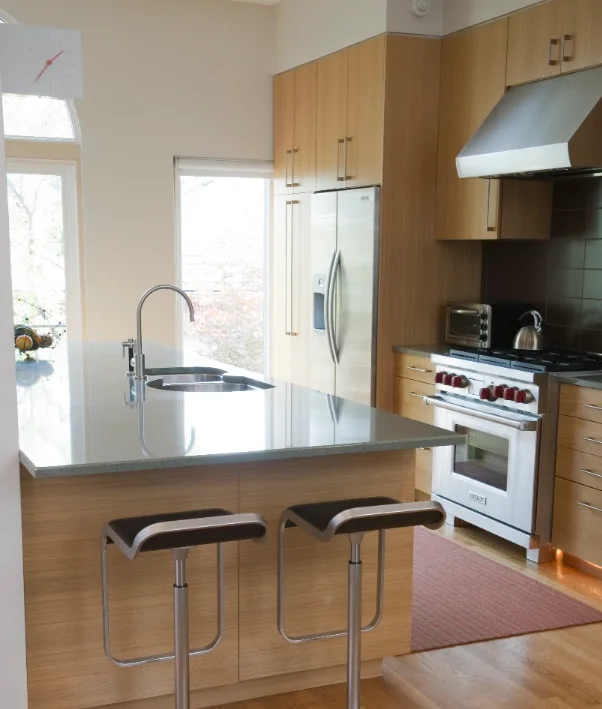
  • A Condo Kitchen Remodel That Leaves the Mechanicals in Place

    A Condo Kitchen Remodel That Leaves the Mechanicals in Place

    Stand at the sink in most Chicago high-rise kitchens and you can point to the problem: a wall you would love to remove, a range tucked into a corner, an island that would fit if only the sink could move four feet to the left. A condo kitchen remodel starts with the same wish list as a house kitchen, but the building has already made some decisions for you. The drain line connects to a stack that serves every unit above and below. The range hood may only be able to recirculate. Every cabinet and slab has to ride up in a freight elevator.

    Those fixed points rarely stop a great kitchen. They move the creativity into the walls that can come down, the cabinetry and the appliance choices, and a plan can open up a surprising amount while the plumbing, venting and wiring stay exactly where they are.

    The plumbing stack anchors the sink, and the sink anchors the plan

    In a typical tower, kitchens are stacked one above another so that drain and vent lines run vertically through every floor. Your sink connects to that stack within a short horizontal distance, and drain lines need a steady slope to work. Moving a sink far from the stack usually means raising the floor, cutting into a concrete slab, or running lines through the unit below, and buildings tend to resist all three.

    Threshold Design Lab rarely moves mechanicals in a condo for these reasons. Keeping the sink near its current location removes a layer of engineering review, protects the neighbors, and puts the budget into the cabinetry, stone and lighting you see and use every day.

    Within that limit there is often more room than people expect. A sink can usually shift along the same wall, turn the corner onto a short return, or move into a peninsula that sits close to the original wet wall. The dishwasher, which drains through the sink plumbing, travels with it. Once the sink is placed, the rest of the plan organizes itself around the work triangle and the landing space on either side.

    Venting decides where the range can go

    Many high-rise units cannot duct a range hood to the outside. Exterior walls are often curtain wall or masonry the association controls, and new penetrations are rarely allowed. Some buildings have a shared exhaust shaft; others allow only recirculating hoods.

    This matters for condo kitchen design because it changes the range’s ideal location and the type of cooking surface you choose. If the existing duct runs to a specific wall, keeping the range on that wall keeps your ventilation options open. If the hood will recirculate anyway, a cooktop on an island is more realistic, since a recirculating ceiling or downdraft unit does not need a path to the outside. These are questions your design team answers by confirming with the building before the layout is drawn, not after the cabinets are ordered.

    Electrical capacity sets the appliance list

    Older towers were wired for the kitchens of their day. Adding an induction range, a second oven, a steam oven and a wine refrigerator may exceed what the unit’s panel or the building’s riser can supply. Electrical upgrades are possible in many buildings, but they need the right licensed electrician and, often, the building’s sign-off.

    Threshold Design Lab works with licensed electricians, and the sensible order is to confirm capacity during design, so the appliance package matches what the unit can carry. If an upgrade is needed, it gets planned with the rest of the scope, long before the new range is sitting in the hallway waiting for a circuit.

    The freight elevator shapes the cabinetry and the stone

    Every piece of a condo kitchen renovation travels the same route: loading dock, freight elevator, corridor, unit door. Each of those openings has a size limit, and the elevator cab is usually the tightest. Long countertop slabs, tall pantry cabinets and panel-ready refrigerator surrounds are measured against that route before they are ordered.

    The route mostly changes how the kitchen is built, while the finished look stays intact. Cabinetry can be fabricated in sections that join cleanly on site. Stone can be templated with seams placed where they are least visible, often at a sink or cooktop cutout. Elevator reservations and work hours also set the pace of installation, so deliveries are grouped and each trade gets a defined window in the unit.

    Got one fixed wall you keep sketching around? Start the conversation there. Schedule a free consultation and we will talk through what your building allows and where the plan has room to move.

    How far the plan can open up with the mechanicals in place

    Many condo kitchens were enclosed for reasons that no longer apply, and the walls around them are frequently non-structural partitions, not part of the building’s frame. Removing or shortening one of those walls is often the biggest change you can make, and it leaves the stack, the duct and the panel exactly where they were.

    A few patterns come up again and again in Chicago high-rises:

    The galley that becomes a peninsula. Taking down the wall at the end of a galley and extending one run of cabinets into a peninsula opens the kitchen to the living room, adds seating and keeps the sink on its original wall.

    The closed kitchen that gains an island. When the kitchen backs onto a dining area, removing the partition can make room for an island with prep space and storage. Keeping the island free of plumbing avoids new drain runs entirely.

    The corner kitchen that borrows a hallway. Some units have an awkward entry corridor next to the kitchen. Absorbing part of it into a tall wall of pantry and appliance storage can transform how the kitchen works without touching a single pipe.

    Each of these depends on confirming what is inside the wall before it comes down. Partitions can hide vent lines, electrical runs or a column that cannot move, which is why the existing conditions are verified early in design.

    Custom millwork makes the fixed points disappear

    When the layout is set by the building, the cabinetry does the work of making the kitchen feel intentional. Panels can wrap a column so it reads as part of the design. A soffit that hides a duct can become a run of upper cabinets that reach it cleanly. Fillers and odd dimensions are absorbed into drawers, pullouts and tall storage built for that exact space, and the awkward depth beside a column can turn into a hidden spice pullout or a shallow pantry behind a flush panel that nobody guesses is there.

    Custom work pays off most when one team draws the kitchen and details the cabinetry. The millwork is built from the elevation drawn in design, so the panels and fillers that disguise a column or soffit are sized to the real conditions. Our Barry project, a condo kitchen and bathroom remodel, shows the result: Threshold Design Lab developed the plans and elevations, designed the custom millwork, and scheduled and managed the vendors and subcontractors.

    Still deciding who should lead the work? It helps to know what a kitchen renovation designer is responsible for, and the step-by-step process to remodel kitchens in Chicago shows how the pieces fit together from measurement to install. Condo kitchens are one part of our residential interior design and remodeling practice, and a kitchen paired with a bathroom or two, or a whole unit, is the kind of project where one team holding design and construction makes the biggest difference.

    A better kitchen comes from working with the building

    The kitchens that feel most generous in a tower are rarely the ones that moved the most pipes. They kept the mechanicals in place, opened the walls that could open, and used cabinetry to make every fixed point look planned from day one. Working that way also keeps the board review short and the neighbors on your side, and it leaves more of the budget for the parts of the kitchen you touch.

    We would love to see your current kitchen and hear how you cook, host and live in it, along with where the stack and the hood duct sit today. Arrange a free first meeting with our team at your unit or by video, or dial (773) 433-0042.

    Frequently Asked Questions

    Can I add a sink to a kitchen island in a condo?

    Sometimes. It depends on how close the island sits to the existing stack, how the drain can be sloped and whether the building allows work in the slab. An island prep sink near the original wet wall is far more realistic than one across the room, and this is confirmed with the building before the design is final.

    Is a gas range possible in a high-rise condo?

    Some towers do not supply gas to individual units, and buildings that do may restrict changes to gas lines. Induction is a popular alternative because it needs only electrical capacity. Your design team confirms what the building offers before the appliance package is chosen.

    Do I need board approval to remove a kitchen wall?

    Most associations want to review any wall removal, even a non-structural partition, because walls can contain building systems. Expect to submit drawings and, in some buildings, have the building engineer confirm what the wall contains.

    How do I keep a condo kitchen from feeling cramped without making it bigger?

    Continuous materials, cabinetry that runs to the ceiling, integrated appliance panels and lighting under upper cabinets all make a compact kitchen feel larger. Reducing visual breaks matters more than adding square footage.

    Will I be able to live in my unit during the remodel?

    Many owners stay during a kitchen-only project, though it means a period without a working kitchen and with construction during the building’s work hours. If the remodel includes bathrooms or flooring throughout, moving out for part of the project is often easier.

  • Home Office Interior Design in Chicago: Built to Work, Designed to Belong

    Home Office Interior Design in Chicago: Built to Work, Designed to Belong

    The room has to hold two monitors, a printer, files, and a camera-ready background for client calls. It also sits eight feet from a living room you spent a year getting right. Most of the advice available pushes you toward one side of that or the other: a productive room that looks like a rented cubicle, or a handsome room you cannot work in for six hours straight.

    You can have both, but home office interior design in Chicago only delivers it when space planning, layered lighting, sound control, and built-in millwork are designed together rather than bought separately. Those decisions are made early, on paper, before a single cabinet is ordered, and they are difficult to retrofit afterward.

    Each of those layers is specified differently, from desk clearances and lamp placement through to concealed power and window treatments, and what follows walks through them in the order they get decided. The practical result is knowing what to ask for in a proposal: which drawings you should be shown, what belongs on a material selection list, and how installation is supervised so the finished room matches the plan you approved.

    Plan a Home Office That Performs Like a Workplace

    A home office earns its square footage when it supports the same tasks a leased office would: focused work, recorded calls, secure file storage, and the occasional guest. That standard, set at the start, drives every later decision about layout, finish, and cabinetry.

    What Home Office Interior Design in Chicago Needs to Solve

    Good home office interior design in Chicago solves four problems at once: too little natural light in winter, street and stair noise in dense neighborhoods, older wiring that was never planned for six devices, and a shortage of closed storage. Vintage two-flats, high-rise condos, and North Shore new builds each fail differently, so the survey comes first.

    Take measurements of ceiling height, window sill height, radiator or vent locations, and existing outlet positions before choosing anything. Those numbers determine whether a full-height built-in is possible or whether a desk with an upper shelf is the smarter answer.

    Defining Focus, Collaboration, Privacy, and Client-Facing Needs

    Write down how many hours a week the room hosts each activity. A CPA taking twenty client video calls needs a controlled backdrop and a door; a writer needs a quiet corner and wall space for books.

    • Focus work: an uninterrupted desk run of at least 60 inches, back to a solid wall
    • Video calls: a camera sightline that shows shelving or paneling, never a bathroom door
    • Two-person meetings: clearance for a second chair without moving the desk
    • Records storage: locking file drawers sized for legal or letter, decided now

    Full-service interior design services turn that list into a program document, which is what a designer prices against. Sharing it honestly is where trust in the process starts.

    Establishing a Budget and Scope Before Selecting Finishes

    Set the budget before anyone shows you a wood sample. An itemized budget separates construction (electrical, drywall, paint), millwork, furniture, lighting, and window treatments, so you can see where money moves when priorities shift.

    Scope creep in an office happens through hidden work: adding circuits, patching plaster, or relocating a return vent. Naming those line items early keeps the finish selections from getting squeezed later, which matters once you start placing the desk in the room.

    Start With Space Planning and Daily Workflow

    Space planning fixes the room’s performance before any material is chosen. The desk position, door swing, and window wall together decide whether the office feels calm or cramped.

    Choosing the Right Room, Orientation, and Level of Separation

    Pick the room by acoustic separation first, then by light. A bedroom off a hallway beats a loft over a stairwell, even when the loft has better views.

    Face the desk toward the entry when clients or family come and go, so you see who arrives. A north-facing window gives steady, even light with almost no glare, which suits screen work in Lincoln Park condos and Winnetka additions alike.

    Creating Zones for Deep Work, Video Calls, Meetings, and Storage

    Divide the floor plan into zones with real dimensions. Award-winning workplace zoning uses the same logic at commercial scale, separating focus space, phone pods, video-conference rooms, and lounge areas into distinct settings rather than trusting one room to do all four jobs.

    At home, scale that down to three or four defined areas: a primary desk, a reference or printing counter, a seating spot, and closed storage. Residential interior design in Chicago works best when the zones share one continuous cabinetry line so the room still reads as one space.

    Making Compact Chicago Rooms Feel Ordered Rather Than Overfilled

    In a 9-by-11 room, depth control does the work. A 24-inch desk surface with a 12-inch upper shelf frees more floor than a 30-inch desk with a rolling cabinet.

    Run cabinetry to the ceiling, keep the lower 30 inches open for legs and a chair, and hold one wall clear. That discipline gives you room to solve comfort, sound, and light next.

    Balance Ergonomics, Acoustics, Lighting, and Technology

    These four systems are specified together because each one changes the others. A brighter lamp fixes glare only when the desk already sits at the right height and angle.

    Specify a Desk and Seating Setup for Comfortable, Sustained Work

    Set the work surface at 28 to 30 inches for a fixed desk, and confirm knee clearance of at least 24 inches deep. A sit-stand mechanism needs clearance behind the cabinetry so the top can travel, and the amount depends on the mechanism, so get it from the specification sheet before the millwork is drawn.

    Choose the chair before the desk, then match the surface height to it. Test the reach with your arms: keyboard, mouse, and phone should all fall inside the arc you can sweep without leaning forward.

    Use Layered Lighting for Screen Work, Reading, and Video Meetings

    Use three layers: ambient ceiling light on a dimmer, a task lamp beside the monitor, and a soft front light for calls. Never place a fixture directly behind the screen or directly behind your head on camera.

    For color, 3000K to 3500K lamps keep skin tones natural on video without going cold. Add dimmers on every circuit so the room works at 8 a.m. and 6 p.m.

    Control Noise and Privacy Without Making the Room Feel Institutional

    Sound control comes from mass and soft surfaces. A solid-core door with a sweep, a wool rug with pad, lined drapery, and books on open shelving cut echo noticeably.

    Inside walls, mineral wool batts and a second layer of drywall handle voices from adjacent rooms. None of that shows in the finished room.

    Integrate Power, Charging, Screens, and Cables Before Installation

    Power planning happens during design, not after. Mark every device on the elevation, then locate outlets inside cabinets and behind the monitor wall.

    • Dedicated circuit for computer equipment and a surge outlet
    • Grommets in the desktop, sized and placed on the shop drawing
    • A wire chase behind the desk panel from floor to shelf
    • Data drop plus a cabinet vent for a router or network gear

    Getting those details into the drawings is exactly what lets the office disappear into the rest of the house.

    Make the Office Feel Native to the Rest of the Home

    The office belongs when it repeats the finishes already in the home: the same paint sheen, the same door hardware, the same wood tone as the nearby stair or kitchen. Attention to detail at this level is what keeps a working room from feeling bolted on.

    Carry the Home’s Material Palette Into Built-Ins and Furniture

    Pull three references from the adjacent rooms: cabinet color, metal finish, and floor tone. Match stile and rail widths to existing doors so the profiles line up down the hall.

    Rift-sawn white oak, painted poplar with a satin finish, and brushed brass pulls all cross easily between a kitchen and an office. Consistency here costs nothing extra when it is decided during selections.

    Use Bespoke Millwork to Conceal Storage and Technology

    Built-ins hide the parts of work that break the room’s calm. A hinged panel covers the printer, a vented drawer holds network gear, and a lift-top box takes charging cords off the desk.

    This is where the design-to-fabrication handoff pays off. Elevations dimensioned to the wall, then built by the same team through in-house custom millwork, remove the guesswork that shows up as uneven reveals and doors that bind. TDL Custom builds those pieces from the approved drawings, so what is drawn is what gets installed.

    Select Window Treatments That Manage Glare and Preserve Privacy

    Pair a solar shade with a drapery panel. A 3 to 5 percent openness shade cuts glare while keeping the view; the drapery adds softness and absorbs sound.

    Mount the shade inside the jamb and the drapery rod near the ceiling to make the window read taller. Top-down bottom-up shades give street-level privacy in Old Town and Park Ridge without blocking daylight.

    Adapt Luxury Interior Design Ideas to Modern Farmhouse and Urban Homes

    In a modern farmhouse, shaker doors, a painted island-style desk, and iron hardware fit naturally. In a River North or Gold Coast unit, flat-panel oak, integrated pulls, and a stone desk return read cleaner.

    The same luxury interior design ideas apply either way: continuous grain, hidden fasteners, and integrated lighting. Turning those ideas into a built room takes documentation.

    Turn a Clear Vision Into a Buildable Office

    The drawings and schedules decide whether the finished office matches what you approved. Documentation, procurement, and installation oversight are the three places projects gain or lose accuracy.

    What Space Plans, Elevations, and Material Selections Should Show

    A space plan should show furniture at true size, clearances, door swings, and outlet locations. Elevations should show cabinet heights, drawer sizes, shelf spacing, and where every appliance or device lands.

    Material selections belong in a written list with product names, finishes, and quantities. Ask for that package before construction; comparing it to the itemized budget is how you verify scope.

    Coordinate Procurement, Lead Times, and Trades Before Work Begins

    Order long-lead items first. Custom seating and drapery hardware can arrive well after cabinetry, so the schedule sequences deliveries against trade dates.

    Electricians rough in before drywall, painters finish before millwork installs, and flooring protects last. That sequencing is ordinary project management, and it prevents the most expensive kind of rework.

    Why Installation Oversight Protects the Design Intent

    Site conditions rarely match the plan exactly. Walls run out of plumb, floors slope, and a scribe strip solves what a drawing cannot.

    Having a designer on site during install means those calls get made against the original intent by someone who knows which dimension was load-bearing for the design and which one was not.

    A Home Office Worth Returning to Each Day

    A home office works when the plan, the lighting, the sound control, and the cabinetry were designed as one set of decisions. Zones sized to real tasks, three lighting layers on dimmers, concealed power, and built-ins that repeat the home’s palette produce a room that supports long workdays and still belongs to the house.

    Moving from inspiration to a committed project starts with a conversation about how you use the room now and what is not working about it. Threshold Design Lab has been designing and building this kind of room in Chicago for thirty years, with fabrication handled in-house so the drawings and the finished piece agree.

    The most useful thing you can bring is not a mood board. It is an honest account of the six hours you spend in there. Start the conversation, call (773) 433-0042, or email paul@thresholddesignlab.com.

    Frequently Asked Questions

    What Should Be Included in a Professionally Designed Home Office?

    A complete home office includes a space plan, elevations, a lighting plan with dimmers, a power and data layout, storage sized to your files, and window treatments. Material selections should be listed by product and finish so nothing is chosen on site.

    How Much Space Do I Need for a Functional Home Office?

    There is no minimum that holds everywhere, but a single-person office tends to work from roughly 80 to 100 square feet, with a 60-inch desk run and about 36 inches of clear floor behind the chair. Add a guest chair or a second workstation and that grows. What matters more than the total is the shape: a narrow room with one good wall often outperforms a wider one with none.

    How Can I Make a Home Office Look Cohesive With the Rest of My Home?

    Repeat three existing elements: the trim profile, the cabinet color or wood tone, and the metal finish on hardware. Matching paint sheen and door style to adjacent rooms does more for cohesion than adding new decorative details.

    What Lighting Is Best for a Home Office With Video Calls?

    Use a soft, front-facing light source at eye level, ambient ceiling light on a dimmer, and a task lamp beside the monitor. Lamps in the 3000K to 3500K range keep skin tones natural and avoid the blue cast that reads harsh on camera.

    Should I Use Custom Built-Ins in a Home Office?

    Custom millwork is worth it when the room is small, has odd angles, or needs to hide a printer, router, and cords. Built-ins use full wall height and depth that stock furniture cannot, which frees floor space and keeps sightlines clean.

    When Should I Hire an Interior Designer for a Home Office Renovation?

    Hire a designer before electrical or demolition work begins, since outlet locations, lighting circuits, and cabinet dimensions are all set at that stage. Bringing office interior design in at the drawing phase costs far less than correcting rough-in later.